Eyeball Oreo truffles are a spooky Halloween treat that'll make your guests squirm with delight. You'll start by crushing Oreos and mixing them with cream cheese to form balls. After chilling, you'll dip these in white chocolate and decorate them to look like realistic eyeballs. The best part? No baking required! You can customize the flavors using different Oreo varieties and get creative with the decorations. These creepy treats are perfect for Halloween parties and can be stored in the fridge for up to a week. With a bit of practice, you'll be whipping up batches of these eerie confections in no time. Keep exploring to uncover the secrets of making these eye-catching treats.
Key Takeaways
- Eyeball Oreo Truffles are no-bake Halloween treats made with crushed Oreos, cream cheese, and white chocolate.
- Decorating techniques include using red candy melts or tinted chocolate to create veiny effects on the white surface.
- Basic ingredients are Oreo cookies, cream cheese, white chocolate chips, and food coloring for customization.
- These treats can be stored in an airtight container in the refrigerator for up to a week.
- Customization options include using different Oreo flavors and experimenting with various colors for the iris.

KIDU PANTRY Chocolate Melting Wafers Bulk Bag Perfect For Dipping, Deserts, Baking And More (1 Pound, White 2026)
- High-Quality Melting Formula: Smooth, silky finish without tempering
- Multi-Purpose Usage: Ideal for dipping, molding, and hot chocolate
- Resealable Packaging: Keeps wafers fresh and protected
As an affiliate, we earn on qualifying purchases.
As an affiliate, we earn on qualifying purchases.
History

Tracing the origins of Eyeball Oreo Truffles reveals a relatively recent culinary invention. You'll find that these spooky treats first gained popularity in the early 2000s as Halloween-themed desserts.
They're a creative twist on the classic Oreo truffle, which was developed by home cooks experimenting with crushed Oreo cookies and cream cheese.
The eyeball design was inspired by the growing trend of creepy, yet edible, Halloween snacks. Bakers and food bloggers started sharing their versions online, leading to a surge in popularity.
You'll notice that the basic recipe hasn't changed much over the years, but decorating techniques have evolved.
Initially, people used candies like M&Ms or jelly beans for the irises. Now, you'll see more intricate designs using food coloring, edible markers, and even airbrushing techniques.
The truffles have become a staple at Halloween parties and are often featured in cooking magazines and TV shows during the spooky season.
They've also inspired similar eyeball-themed treats using different base ingredients, showing how a simple idea can spark culinary creativity.
Recipe
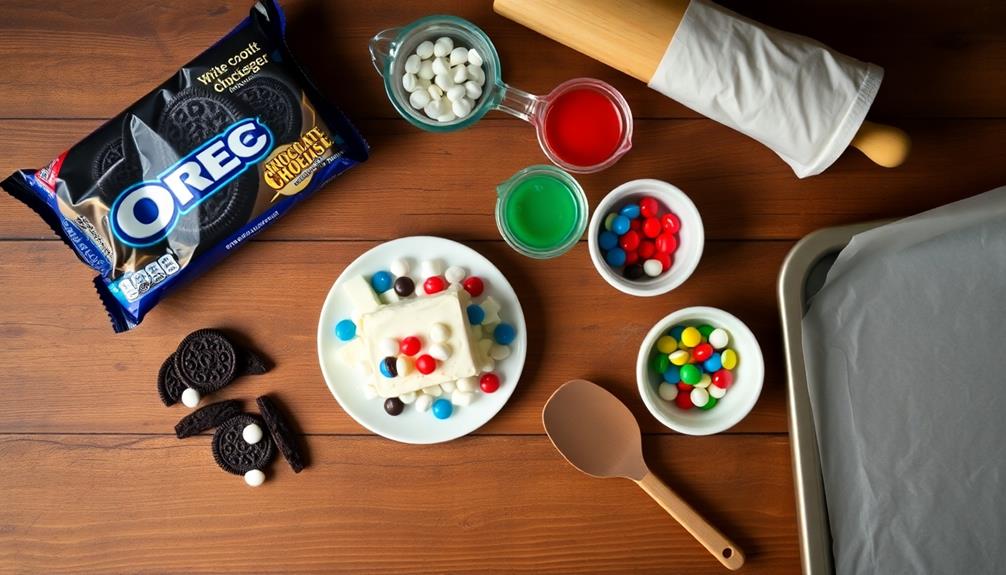
These Eyeball Oreo Truffles are a deliciously spooky treat perfect for Halloween parties or any eerie-themed gatherings. Combining the rich, creamy texture of Oreo truffles with a ghoulish eyeball design, these treats are sure to be a hit with both kids and adults alike.
The recipe is simple to follow and requires no baking, making it an ideal project for novice cooks or those looking for a quick and easy Halloween dessert. The truffles can be customized with different colors and designs to suit your particular theme or preference.
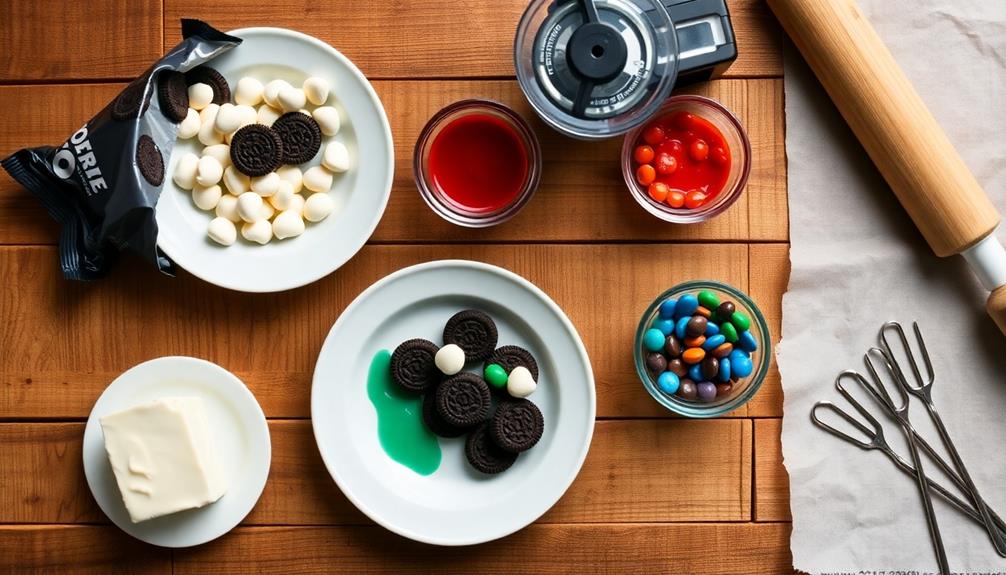
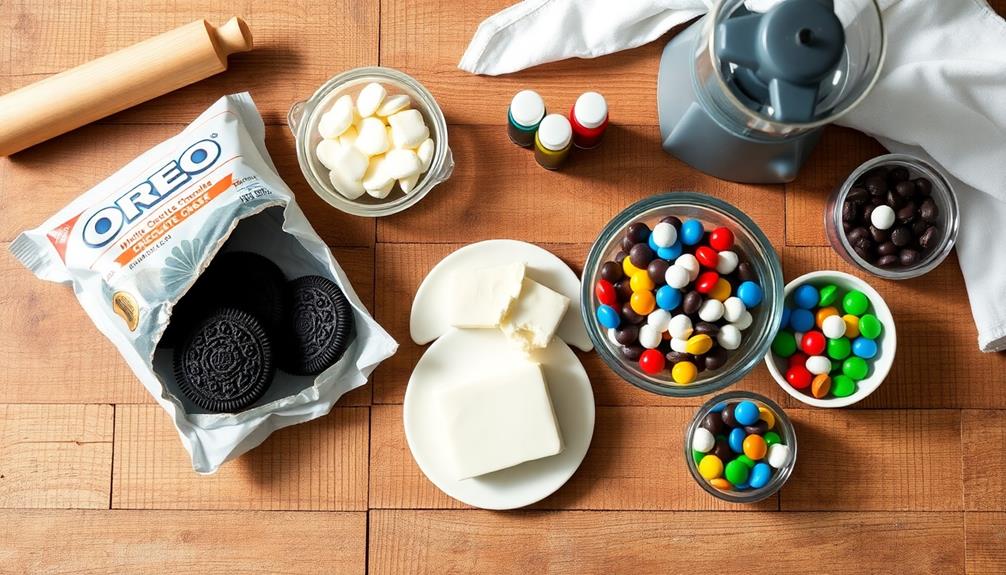
- 1 package (14.3 oz) Oreo cookies
- 1 package (8 oz) cream cheese, softened
- 12 oz white chocolate chips or candy melts
- 1/4 cup semi-sweet chocolate chips
- Assorted food coloring (red, blue, green)
- Small round candies or M&Ms for pupils
To make the Eyeball Oreo Truffles, start by crushing the Oreo cookies into fine crumbs using a food processor or by placing them in a sealed plastic bag and crushing with a rolling pin.
Mix the cookie crumbs with softened cream cheese until well combined. Roll the mixture into small balls and place them on a lined baking sheet. Freeze the balls for about 15 minutes to firm up.
Melt the white chocolate and dip each truffle ball to coat completely. Once set, use melted semi-sweet chocolate to draw iris patterns on the truffles. Add small candies for pupils and use food coloring to create bloodshot effects or different eye colors.
For best results, allow the truffles to set completely between layers of decoration. If the white chocolate coating starts to harden while you're working, reheat it gently in short bursts in the microwave.
These truffles can be made ahead of time and stored in an airtight container in the refrigerator for up to a week. For an extra creepy touch, consider adding edible glitter or using glow-in-the-dark food coloring for a truly haunting effect.
Cooking Steps

To create these spooky Oreo truffles, you'll start by crushing the cookies into fine crumbs and mixing them with cream cheese.
Next, you'll form the mixture into small balls and dip them in melted white chocolate for that eerie eyeball effect.
Step 1. Crush Oreos Into Fine Crumbs

The first step in creating these spooky Eyeball Oreo Truffles is to crush the Oreo cookies into fine crumbs. You'll need about 36 regular Oreo cookies for this recipe.
Start by removing them from the package and placing them in a large, sealable plastic bag. Make sure to squeeze out any excess air before sealing the bag tightly.
Now, it's time to get crushing! You can use a rolling pin or a heavy kitchen utensil to smash the cookies. Begin by gently tapping the bag to break the cookies into smaller pieces. Then, apply more pressure and roll over the bag to crush the cookies further.
Keep at it until you've got a bag full of fine, even crumbs. It's important to crush them thoroughly, as larger chunks might make your truffles lumpy.
If you don't have a rolling pin, don't worry! You can also use a food processor to blitz the cookies into crumbs. Just pulse them in short bursts until they're finely ground.
Once you're done, your Oreo crumbs are ready for the next step in making these creepy-cool treats!
Step 2. Mix Crumbs With Cream Cheese

Now that you've got your fine Oreo crumbs ready, it's time to mix them with cream cheese. In a large mixing bowl, add your crushed Oreos and softened cream cheese. You'll want to use about 8 ounces of cream cheese for every 36 Oreos you've crushed.
Make sure your cream cheese is at room temperature, as this will make it much easier to mix. Using a sturdy spoon or your clean hands, start combining the crumbs and cream cheese. You'll need to work the mixture thoroughly, making sure there are no dry spots or cream cheese lumps.
It might feel a bit messy at first, but keep at it! As you mix, you'll notice the mixture becoming more uniform and starting to stick together. This is exactly what you want.
Once everything is well combined, you should have a thick, dough-like mixture. It should be moist enough to hold together when you squeeze it, but not so wet that it's sticky. If it seems too dry, you can add a little more cream cheese. If it's too wet, mix in some extra Oreo crumbs.
Step 3. Form Mixture Into Balls

With your Oreo and cream cheese mixture ready, it's time to shape it into balls. Start by scooping out small portions of the mixture, about a tablespoon each.
Roll each scoop between your palms, applying gentle pressure to form smooth, round balls. If the mixture feels too sticky, you can lightly dust your hands with powdered sugar to make the process easier.
Aim for uniformity in size, as this will ensure even cooking and a more professional appearance. As you shape each ball, place it on a baking sheet lined with parchment paper.
Don't worry if they're not perfectly round at first; you can always reshape them later. If the mixture becomes too soft while you're working, pop it in the refrigerator for a few minutes to firm up.
Once you've formed all the balls, place the baking sheet in the refrigerator for about 30 minutes. This chilling time will help the balls hold their shape and make them easier to dip in the next step.
Step 4. Dip Balls in White Chocolate
Melting white chocolate forms the foundation for transforming your Oreo balls into eerie eyeballs.
Start by placing white chocolate chips or chopped white chocolate in a microwave-safe bowl. Heat in 30-second intervals, stirring between each, until it's smooth and completely melted. Be careful not to overheat, as white chocolate can burn easily.
Once your chocolate is ready, it's time to dip! Use a fork or dipping tool to lower each Oreo ball into the melted chocolate. Gently tap the fork on the bowl's edge to remove excess chocolate, ensuring an even coating.
Place the dipped balls on a parchment-lined baking sheet. If the chocolate starts to thicken, you can reheat it briefly.
For a smoother finish, you can double-dip the balls. Let the first layer set for a few minutes, then dip again. This creates a thicker, more opaque coating that really makes your eyeballs pop!
Don't worry if they're not perfect – a few imperfections can add to the creepy effect. Let the chocolate set completely before moving on to the next step.
Step 5. Add Red Candy Veins

To create realistic bloodshot eyeballs, you'll need to add red candy veins to your white chocolate-coated Oreo truffles. Once your truffles have cooled completely, it's time to give them that spooky, bloodshot look. You'll want to use red candy melts or red-tinted white chocolate for this step.
Start by melting your red candy in a microwave-safe bowl, stirring every 30 seconds until smooth. Transfer the melted candy to a small piping bag or a zip-top bag with a tiny corner snipped off.
Now, carefully pipe thin, squiggly lines across the surface of each truffle. Don't worry about making them perfect – real eyes aren't symmetrical! Vary the thickness and direction of the lines for a more natural appearance. Remember, less is more; you don't want to overwhelm the white surface.
If you make a mistake, don't panic. You can quickly wipe off the red candy with a paper towel while it's still warm.
Once you're satisfied with your veiny masterpieces, let them set completely before moving on to the next step in your eyeball creation process.
Final Thoughts
These Eyeball Oreo Truffles are sure to be a hit at your next Halloween party or spooky gathering.
They're not only delicious but also a fun and creative way to get into the Halloween spirit. You'll love how easy they're to make, and your guests will be impressed by their eerie appearance.
Remember, you can customize these treats to fit your preferences. If you want a different flavor, try using mint Oreos or even peanut butter ones. You could also experiment with different colors for the iris or use various candies for the veins. Don't be afraid to get creative!
When storing your Eyeball Oreo Truffles, keep them in an airtight container in the refrigerator. They'll stay fresh for up to a week, but let's be honest – they probably won't last that long!
If you're making them ahead of time for a party, you can freeze them for up to a month. Just thaw them in the fridge before serving.
With these spooky treats, you're all set to impress your friends and family this Halloween season. Enjoy your creepy creation!
Frequently Asked Questions
How Long Can Eyeball Oreo Truffles Be Stored?
You can store your truffles for up to five days in an airtight container in the refrigerator. If you'd like to keep them longer, they'll last up to three months in the freezer. Don't forget to thaw before serving!
Are There Any Allergen-Free Alternatives for Making These Truffles?
You can make allergen-free truffles using gluten-free cookies, dairy-free cream cheese, and vegan white chocolate. For the eyeball design, try using natural food coloring and agar-agar instead of gelatin. Always check ingredients for potential allergens.
Can I Use Different Flavors of Oreos for This Recipe?
You can definitely use different Oreo flavors! It's a fun way to experiment with taste. Try mint, peanut butter, or seasonal varieties. You'll get unique colors and flavors that'll make your truffles stand out.
What's the Best Way to Transport Eyeball Oreo Truffles?
To transport truffles, you'll want to keep them cool and secure. Use an airtight container lined with wax paper or parchment. Place them in a single layer, separating multiple layers with more paper. Don't forget to pack ice packs!
Can I Make These Truffles in Advance for a Party?
You can definitely make these truffles in advance for your party. They'll keep well in the fridge for up to a week. Just store them in an airtight container and let them come to room temperature before serving.