You can easily make spookily delightful witch's hat cookies! These festive treats have been around for centuries, originally linked to Halloween and witches. Today, you can find them in all sorts of shapes, sizes, and flavors. The classic version features a chocolatey cookie base topped with creamy frosting and colorful candies for a visually appealing witch's hat design. It's a fun baking project that combines simple ingredients and easy preparation steps. Whether you're a novice or experienced baker, you'll enjoy the creative process – and your cookies will be a hit at any Halloween party or gathering. To learn more about the history and step-by-step instructions, keep reading.
Key Takeaways
- Witch's Hat Cookies are a traditional Halloween treat, featuring a chocolatey cookie base topped with creamy frosting and decorated as iconic witch's hats.
- The cookies can be made with simple ingredients like butter, sugar, flour, and cocoa, making them accessible for both novice and experienced bakers.
- Decorating the cookies with piped frosting and colorful candy toppings allows for creative expression and customization, enhancing the visual appeal and taste.
- Baking and decorating Witch's Hat Cookies can be a fun, bonding activity for families and friends, fostering the festive spirit of Halloween.
- Following tips like gathering all ingredients, allowing cookies to cool, and using piping bags can help ensure successful preparation and presentation of the Witch's Hat Cookies.

Hodvya 5pcs Halloween Cookie Cutters Set shapes Pumpkin, Bat, Ghost, Witch's Hat, Cat Halloween Holiday cookie decorating kit
【TIP】: Before first use, please thoroughly wash off the food-grade mineral protective oil on the surface of the…
As an affiliate, we earn on qualifying purchases.
As an affiliate, we earn on qualifying purchases.
History
Witch's hat cookies have a rich history that dates back centuries. These whimsical treats were first associated with the Halloween season, when witches and their pointed hats were a popular symbol of the holiday. As the tradition of baking festive cookies gained popularity, the witch's hat design emerged as a clever way to celebrate the spooky festivities.
Over time, the recipe and decorating techniques have evolved, but the basic concept remains the same. Today, you can find witch's hat cookies in a variety of shapes, sizes, and flavors, from classic chocolate to creative variations.
The cone-shaped hats, often made with sugar cookie dough or wafer cookies, are typically topped with icing, sprinkles, or other edible decorations to capture the essence of a witch's iconic headwear.
Whether you're baking them for a Halloween party or simply enjoying them as a seasonal treat, witch's hat cookies continue to delight and enchant bakers and dessert lovers alike.

Riccle Piping Bags and Tips Set, 11.8 Inch 100 Anti Burst Piping Bags, 124 Pcs Cake Decorating Kit with 16 Piping Tips, 1 Reusable Pastry Bags, 3 Cake Scrapers, 2 Couplers, and 2 Icing Bags Ties
Riccle Piping Bags and Tips Set, 11.8 Inch 100 Anti Burst Piping Bags, 124 Pcs Cake Decorating Kit…
As an affiliate, we earn on qualifying purchases.
As an affiliate, we earn on qualifying purchases.
Recipe
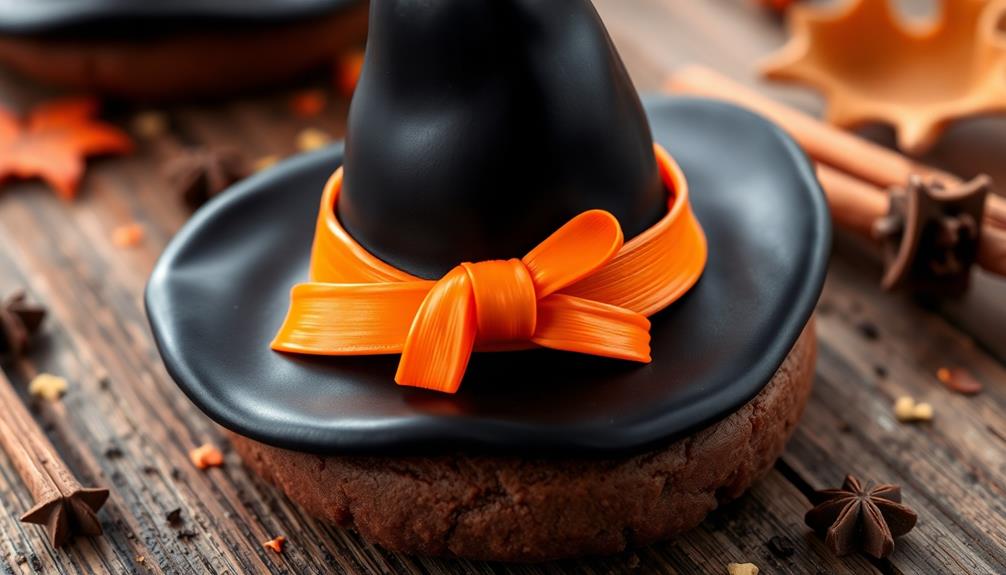
Witch's Hat Cookies are a fun and festive treat perfect for Halloween. These whimsical cookies feature a rich, chocolatey base topped with a classic witch's hat made from fondant or royal icing. Whether you're hosting a spooky party or simply want to add a touch of magic to your baking, these cookies are sure to delight.
The recipe is straightforward, making it a great project for both experienced and novice bakers. With a few simple ingredients and a bit of creativity, you can create a batch of these enchanting cookies that will have your guests clamoring for more.
Ingredients:
- 1 cup (2 sticks) unsalted butter, softened
- 1 cup granulated sugar
- 1 egg
- 2 teaspoons vanilla extract
- 2 cups all-purpose flour
- 1/2 cup unsweetened cocoa powder
- 1/2 teaspoon baking soda
- 1/4 teaspoon salt
- Fondant or royal icing, in black and orange
Directions:
Preheat your oven to 350°F (175°C). In a large bowl, cream the softened butter and granulated sugar together until light and fluffy. Beat in the egg and vanilla extract.
In a separate bowl, whisk together the all-purpose flour, unsweetened cocoa powder, baking soda, and salt. Gradually add the dry ingredients to the wet ingredients, mixing until a dough forms. Chill the dough for at least 30 minutes.
Once chilled, scoop the dough by the tablespoonful and roll into smooth balls. Place the balls on a parchment-lined baking sheet, spacing them about 2 inches apart. Bake for 8-10 minutes, or until the edges are set and the centers are still slightly soft. Allow the cookies to cool on the baking sheet for 5 minutes before transferring them to a wire rack to cool completely.
When the cookies are cool, use fondant or royal icing to create the witch's hat topping. Divide the black fondant or icing into small pieces and shape them into pointed hats. Attach the hats to the center of each cookie using a small amount of icing or water.
For a finishing touch, use orange fondant or icing to create a ribbon or buckle detail on the hats.

Edible Halloween Cake Decorations, 27 Count Royal Icing Toppers for Cakes, Cookies, Cupcakes – Pumpkin, Ghost, Witch Hat, Knife, Axe Icing Decoration – Spooky Baking Supplies for Halloween Party
🎃Royal Icing Decorations: 27 count icing decorations set contents: pumpkins blue*3, pumpkins orange*3, pumpkins purple*3, pumpkins green*3 +…
As an affiliate, we earn on qualifying purchases.
As an affiliate, we earn on qualifying purchases.
Cooking Steps
First, gather the necessary ingredients and equipment like a baking sheet, parchment paper, and a piping bag.
Next, roll the dough into cone shapes and bake them until golden brown.
Step 1. Gather Ingredients and Equipment

To begin, you'll need to gather a few essential ingredients and tools for crafting these delightful Witch's Hat Cookies.
First, you'll want all-purpose flour, baking powder, salt, unsalted butter, granulated sugar, and an egg. For the kitchen tools, grab a large mixing bowl, a hand mixer or stand mixer, a baking sheet, and a piping bag with a small star-shaped tip.
Preheat your oven to 375°F (190°C) and line a baking sheet with parchment paper.
In the mixing bowl, cream together the softened butter and sugar until light and fluffy. Beat in the egg until well combined.
In a separate bowl, whisk together the flour, baking powder, and salt. Gradually add the dry ingredients to the wet ingredients, mixing until a smooth dough forms.
Scoop the dough into the piping bag and pipe small, cone-shaped dollops onto the prepared baking sheet.
Bake for 12-15 minutes, until the cookies are lightly golden.
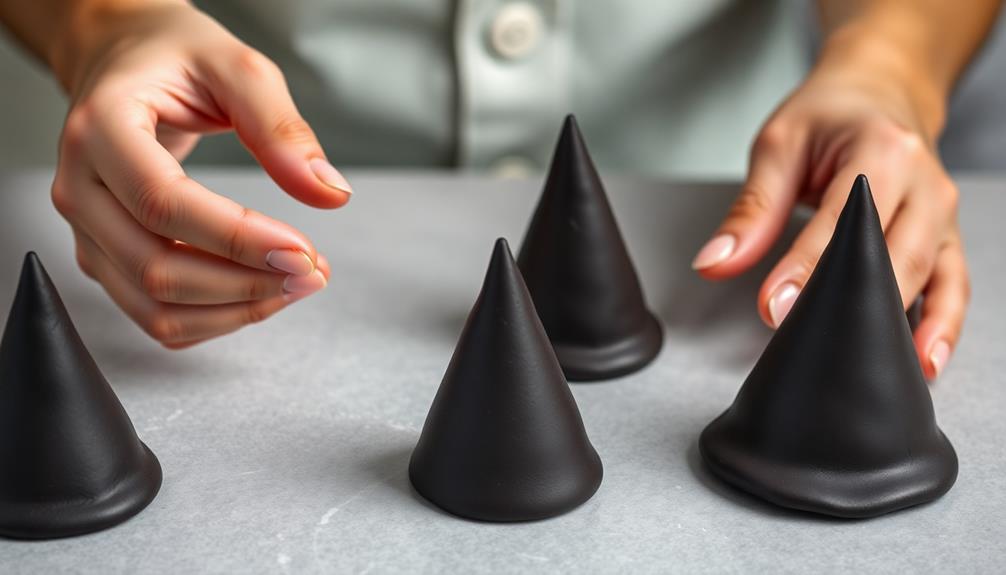
Step 2. Roll Dough Into Cones

After preparing the dough, it's time to shape the cookies. Grab a small handful of the chilled dough and roll it into a smooth, cone-like shape. The key is to apply gentle, even pressure as you roll the dough between the palms of your hands. This will help create the distinct witch's hat silhouette.
Once you've formed the cone, place it on the prepared baking sheet, wide end down. Repeat this process, spacing the cones a few inches apart to allow for spreading.
Be sure to work quickly, as the dough will soften as your hands warm it. If the dough becomes too soft to hold its shape, simply pop the baking sheet in the fridge for a few minutes to firm it up again.
When you've shaped all the dough, it's time to bake your festive witch's hat cookies! Keep an eye on them in the oven, as the pointed tips can brown quickly.
Step 3. Bake the Cone-Shaped Cookies

Preheat your oven to 350°F (175°C). Lightly grease a baking sheet or line it with parchment paper.
Take your cone-shaped dough and carefully transfer them to the prepared baking sheet, spacing them a few inches apart.
Bake the cookies for 12-15 minutes, keeping a close eye on them. They should start to turn a light golden brown on the edges.
Don't overbake, as you want them to stay soft and retain their shape.
Once baked, remove the cookies from the oven and let them cool on the baking sheet for 5 minutes. This allows them to firm up a bit before you transfer them to a wire rack to cool completely.
When the cookies are fully cooled, they're ready to decorate as your favorite witchy hats!
Get creative with colorful icings, sprinkles, and other spooky toppings to bring these magical treats to life.
Step 4. Frost the Cone-Shaped Cookies
Once the cone-shaped cookies have cooled completely, you can begin frosting them.
First, gather your supplies – a piping bag, white buttercream frosting, and food coloring if you'd like to tint the frosting. Gently spoon the buttercream into the piping bag, then snip off a small corner to create a tip.
Starting at the bottom of the cookie, pipe the frosting in a spiral, working your way up to the pointy top. Apply the frosting in smooth, even strokes, making sure to cover the entire surface.
If using food coloring, add a few drops to the buttercream and mix well before piping.
Once the cookies are fully frosted, you can add sprinkles, candy, or other decorations to make them look like witches' hats.
Let the frosting set for about 30 minutes before serving. Your festive witch's hat cookies are now ready to enjoy!
Step 5. Enjoy the Festive Witch's Hat Cookies
With the cookies now fully frosted and decorated, it's time to indulge in these delightful witch's hat treats.
Grab a plate and arrange the cookies in a fun, spooky display. Admire the vibrant colors and whimsical details that bring these festive desserts to life.
Go ahead and take a bite – the crumbly, buttery cookie base pairs perfectly with the sweet icing. As you savor the flavors, imagine you've been transported to a magical Halloween gathering.
These witch's hat cookies are sure to delight all your guests, young and old. Feel free to pair them with hot apple cider or a mug of warm cocoa for an extra cozy touch.
Don't be afraid to get creative and customize your cookies with unique decorations. Most importantly, have fun and enjoy the fruits of your baking labor.
These witch's hat cookies are the perfect way to celebrate the spooky season in style.

Cast Iron Skillet Chocolate Chip Cookie Set
Durable Construction: Crafted from premium cast iron for exceptional heat retention and even cooking
As an affiliate, we earn on qualifying purchases.
As an affiliate, we earn on qualifying purchases.
Final Thoughts
These delightful witch's hat cookies are the perfect Halloween treat. With their whimsical shape and vibrant colors, they're sure to delight both kids and adults. Whether you're hosting a spooky party or simply want to get into the holiday spirit, these cookies are a fantastic addition to your festivities.
The process of assembling the witch's hats may seem a bit intricate at first, but the end result is well worth the effort. The combination of the crisp cookie base, the creamy frosting, and the colorful candies creates a delectable and visually striking dessert.
Plus, preparing these cookies can be a fun activity to do with family or friends, sparking creativity and bonding over the shared experience.
As you bake and decorate these enchanting treats, remember to have fun and let your imagination run wild. The unique and personalized touches you add will make each batch of witch's hat cookies truly special.
Enjoy the fruits of your labor and savor the delicious magic of these Halloween favorites.
Frequently Asked Questions
Can I Use a Different Type of Candy for the Hat?
Sure, you can absolutely use a different type of candy for the hat!
Experiment with a variety of fun-sized candies or chocolate pieces. Just make sure they're the right size and shape to top your cookie hats.
Get creative – the possibilities are endless! Swapping in new candies can add a unique twist and make each cookie truly one-of-a-kind.
Have fun with it and see what yummy combinations you can come up with.
How Long Do the Cookies Need to Cool Before Decorating?
Once the cookies have finished baking, you'll want to let them cool completely before decorating. This will typically take around 15-20 minutes.
Be patient – rushing the cooling process could cause the cookies to become misshapen or the icing to melt.
Once the cookies are room temperature, you're ready to start adding your creative touches! Take your time and have fun bringing your witch's hats to life.
Can I Freeze the Baked Cookies for Later Use?
You can definitely freeze the baked cookies for later use!
Once the cookies have completely cooled, place them in an airtight container or resealable bag. They'll stay fresh in the freezer for up to 3 months.
When you're ready to use them, just thaw the cookies at room temperature.
This way, you can enjoy your homemade treats anytime, without having to bake them from scratch every time. Easy peasy!
Do the Cookies Need to Be a Specific Size?
The cookies don't necessarily need to be a specific size, but it's best to keep them uniform for even baking.
Smaller cookies may bake faster, while larger ones might take longer. Aim for a diameter of around 2-3 inches to get that classic cookie shape.
Of course, you can get creative and play around with different sizes if you'd like – just be sure to adjust the baking time accordingly.
The key is finding what works best for your personal preference and oven.
Can I Use a Different Type of Chocolate for the Hat?
Yes, you can use a different type of chocolate for the hat. While milk chocolate is a classic choice, dark or white chocolate would also work well.
Just be sure to choose a high-quality chocolate that will melt smoothly and hold its shape when cooled.
Experiment with different types to find the flavor and texture that you enjoy the most. The key is to have fun and get creative with your chocolate selection.