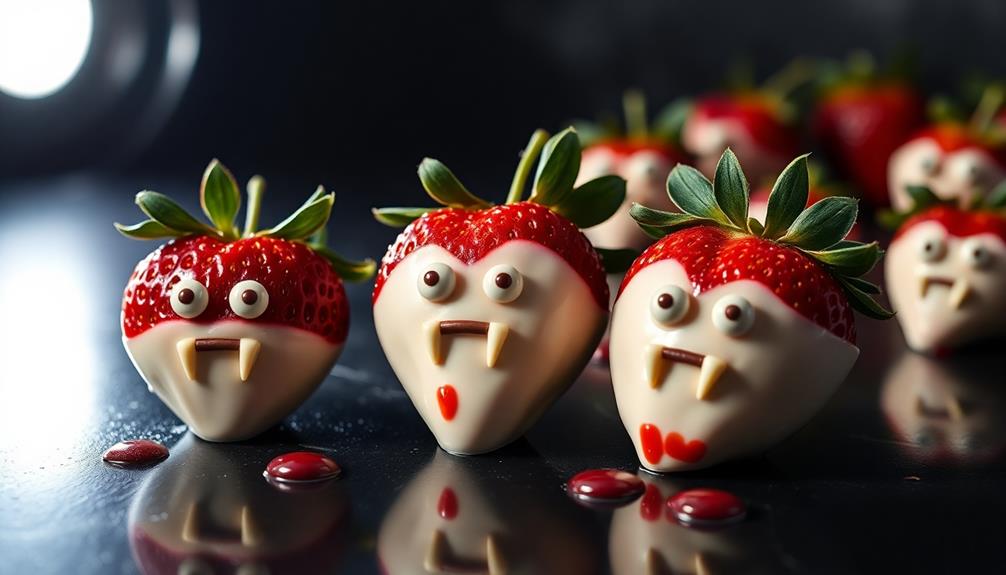

Vampire Bite Strawberries are a spooky and delicious Halloween treat that'll transform ordinary strawberries into eerie, blood-dripping fruits with fang marks. You'll need fresh strawberries, white chocolate, and candy eyes to create these creepy confections. Start by washing and hulling the strawberries, then dip them in melted white chocolate. Add a touch of red food coloring for a bloody effect, and insert candy fangs for the final vampiric touch. These no-bake treats are perfect for Halloween parties and autumn gatherings, impressing both kids and adults with their fun, ghoulish appearance. With a bit of practice, you'll be crafting these spooky sweets like a pro in no time.
Key Takeaways
- Vampire Bite Strawberries are a Halloween-themed dessert featuring strawberries dipped in white chocolate with "bite marks" and candy fangs.
- The recipe requires fresh strawberries, white chocolate chips, dark/milk chocolate chips, mini candy eyes, and optional red food coloring.
- Preparation involves dipping strawberries in melted white chocolate, adding "blood" effects with food coloring, and inserting candy fangs.
- These treats are easy to make, require no baking, and are ideal for Halloween parties or spooky-themed gatherings.
- Presentation is key, with options to arrange on black platters or alongside other Halloween snacks for maximum visual impact.

365 by Whole Foods Market, Mini White Chocolate Baking Chips, 12 Ounce
12 ounces of premium white chocolate mini chips
As an affiliate, we earn on qualifying purchases.
As an affiliate, we earn on qualifying purchases.
History

Tracing the origins of Vampire Bite Strawberries reveals a surprisingly recent culinary innovation. You'll find that these spooky-looking treats first appeared on social media platforms around 2018. They quickly gained popularity as a fun and easy Halloween-themed snack.
The idea behind Vampire Bite Strawberries is simple but clever. You're essentially creating the illusion of a vampire's bite marks on a strawberry using white chocolate. It's a creative twist on chocolate-covered strawberries that adds a playful, Halloween-inspired element to the classic dessert.
As the trend spread, food bloggers and home cooks began sharing their own versions and techniques. You'll notice that some recipes call for adding red food coloring to mimic blood, while others stick to the basic white chocolate "fangs."
The concept has since evolved, with people applying the same idea to other fruits like mandarin oranges or even cupcakes.
While they're not tied to any specific cultural tradition, Vampire Bite Strawberries have quickly become a staple at Halloween parties and autumn gatherings. They're a great example of how social media can spark food trends and inspire creative cooking.

Candy Eyes for Decorating Edible, 1cm Edible Eyes Fun Candy Eyeballs Sprinkles for Baking Cake Cupcake Cookies Ice Cream
【Fun Cake Decorating】Lightly sprinkle candy eyes, just a moment you can add fun expressions to cookies, cupcakes, cakes…
As an affiliate, we earn on qualifying purchases.
As an affiliate, we earn on qualifying purchases.
Recipe

Vampire Bite Strawberries are a delightfully spooky and tasty treat perfect for Halloween parties or any ghoulish gathering. These sweet and slightly sinister-looking treats transform ordinary strawberries into mini vampires with gleaming white chocolate fangs and beady candy eyes.
This no-bake dessert isn't only visually striking but also incredibly easy to make, requiring just a few simple ingredients and minimal preparation time. The combination of fresh strawberries, rich chocolate, and playful decorations creates a fun and memorable snack that both kids and adults will love.
- Fresh strawberries
- White chocolate chips
- Dark or milk chocolate chips
- Mini candy eyes
- Red food coloring (optional)
To create Vampire Bite Strawberries, start by washing and thoroughly drying the strawberries. Melt the white chocolate chips in a microwave-safe bowl, stirring at 30-second intervals until smooth. Dip each strawberry into the melted white chocolate, leaving the top exposed to resemble a vampire's cape. Place them on a parchment-lined baking sheet and refrigerate until set.
Once chilled, use melted dark chocolate to attach the candy eyes and draw a mouth. Finally, carefully insert two small triangles of white chocolate into the strawberry to create fangs.
For best results, choose large, firm strawberries with a defined shape. If desired, add a drop of red food coloring to the white chocolate for a pinkish hue that mimics flesh. To prevent the chocolate from seizing, ensure all utensils and strawberries are completely dry before dipping.
Store the finished Vampire Bite Strawberries in the refrigerator until ready to serve, but allow them to come to room temperature for about 15 minutes before eating to enhance their flavor and texture.

Halloween Silicone Molds for Chocolate,6 Cavities Halloween Large Scary Movie Characters Heads Chocolate Molds, Funny Horror 3D Halloween Chocolate Candy Molds for Soap Pudding Jelly Making
Unique Shape: The chocolate silicone film is designed with a Halloween theme, adding fun and atmosphere to the…
As an affiliate, we earn on qualifying purchases.
As an affiliate, we earn on qualifying purchases.
Cooking Steps

You'll start by washing and hulling the strawberries, then melt white chocolate chips for dipping.
Next, you'll dip the strawberries in the melted chocolate, add a touch of red food coloring for that vampire-like effect, and finally, decorate with candy fangs.
These steps will transform your ordinary strawberries into spooky, bite-sized treats that are perfect for Halloween parties or themed events.
Step 1. Wash and Hull Strawberries

Before diving into the main preparation, you'll need to wash and hull your strawberries. Start by rinsing them under cool running water, gently rubbing each berry to remove any dirt or debris.
Don't soak them, as this can make them waterlogged and less flavorful. Once they're clean, pat them dry with a paper towel or let them air dry on a clean kitchen towel.
Next, it's time to hull the strawberries. You'll want to remove the green leafy top and the white core beneath it. There are a few ways to do this.
You can use a small paring knife to cut around the stem at an angle, creating a small cone-shaped cavity. Or, if you have a strawberry huller tool, simply insert it at the base of the leaves and twist to remove the hull.
If you're in a pinch, you can even use a straw! Just push it through the bottom of the strawberry and up through the top to remove the hull. Whichever method you choose, be careful not to remove too much of the fruit.
Step 2. Melt White Chocolate Chips

The chocolate-melting process is a crucial step in creating your vampire bite strawberries. You'll need a microwave-safe bowl and white chocolate chips to get started. First, pour about a cup of white chocolate chips into the bowl. It's better to melt in small batches to prevent overheating.
Place the bowl in the microwave and set it to 50% power. Heat the chips for 30 seconds, then remove the bowl and stir the chocolate thoroughly. Even if it doesn't look melted, stirring helps distribute the heat evenly.
Repeat this process in 15-second intervals, stirring after each round, until the chocolate is smooth and completely melted. Be careful not to overheat the chocolate, as it can quickly burn or seize up.
If you notice any lumps or graininess, add a teaspoon of vegetable oil and stir gently. This can help smooth out the texture. Once your white chocolate is perfectly melted, it's ready for dipping your strawberries.
Step 3. Dip Strawberries in Chocolate

With your melted white chocolate ready, it's time to dip the strawberries. Hold each strawberry by its green leaves and gently lower it into the chocolate. You'll want to coat about two-thirds of the strawberry, leaving the top exposed.
As you lift it out, give it a gentle shake to remove excess chocolate. Then, carefully twist the strawberry to create an even coating.
Place the dipped strawberries on a parchment-lined baking sheet, making sure they don't touch each other. If you're feeling extra fancy, you can drizzle some leftover chocolate over the strawberries for a decorative effect.
Once you've dipped all your strawberries, it's time to let them set. Pop the baking sheet into the refrigerator for about 15 minutes, or until the chocolate has hardened completely.
Step 4. Add Red Food Coloring

Now that your chocolate-dipped strawberries have set, it's time to give them that spooky vampire bite look. Grab some red food coloring and a small, clean paintbrush or toothpick. You'll use these to create the illusion of blood dripping from your strawberry vampires' mouths.
Start by mixing a few drops of red food coloring with a tiny amount of water to thin it out slightly. This will help it flow better and look more like real blood. Dip your brush or toothpick into the mixture and carefully apply it to the strawberry, starting from the top where the stem was.
Create two small, vertical lines close together to represent the vampire's fangs. Then, let the color drip down naturally, or guide it gently with your brush for a more controlled look.
You can vary the amount of "blood" on each strawberry to make them look unique. Some might've just a trickle, while others could have a more dramatic splatter effect. Remember, a little goes a long way with food coloring, so start with small amounts and build up as needed.
Let the coloring dry completely before serving your creepy, delicious treats!
Step 5. Add Candy Fang Decorations

Let's kick it up a notch by adding some candy fangs to your vampire strawberries. You'll need small white candy fangs, which you can find at most party supply stores or online.
Once you've got your fangs ready, it's time to give your strawberries their bite!
Take each strawberry and carefully insert two candy fangs near the top, where you've already made the "bite" marks with your knife. The fangs should be close together, mimicking a vampire's teeth.
If the fangs don't stick easily, you can use a tiny dab of frosting or melted white chocolate as "glue" to hold them in place. Make sure the fangs are secure but still visible, poking out from the strawberry's flesh.
For an extra creepy touch, you can add a drop of red food coloring or strawberry syrup near the fangs to create a "blood" effect. This step is optional but can really enhance the vampire theme.
Once you've added fangs to all your strawberries, arrange them on a platter, and watch as your friends marvel at these spooky, fruity treats!

Oil Based Food Coloring for Chocolate Rainbow Oil Edible Food Dye Set for Halloween Baking Royal Icing Cookie Supplies Gluten Free 7x6ml Food Grade Food Color Kit, 0.25 Fl. Oz/Bottles
Rainbow Oil Food Coloring for Chocolate Decorating – Vivid oil based food coloring are specially made by the…
As an affiliate, we earn on qualifying purchases.
As an affiliate, we earn on qualifying purchases.
Final Thoughts

Creativity shines through these Vampire Bite Strawberries, making them a perfect treat for Halloween parties or spooky-themed gatherings. They're not only delicious but also visually striking, sure to impress your friends and family.
You'll find that these treats are versatile, too. They can be served as a dessert, used as a cake topper, or even arranged on a platter as a centerpiece.
Remember, you can always experiment with different types of chocolate or candy melts to create various colors and effects. If you're feeling adventurous, try using white chocolate and food coloring to make green or purple "blood" drips.
Don't forget that presentation is key! Arrange your Vampire Bite Strawberries on a black platter or next to other Halloween-themed snacks for maximum impact.
Lastly, these strawberries are best enjoyed fresh, so plan to make them close to when you'll be serving them. With a little practice, you'll become a pro at creating these spooky treats, and they might just become your go-to Halloween recipe.
Happy haunting!
Frequently Asked Questions
Are Vampire Bite Strawberries Suitable for Children's Parties?
You'll find children's parties often benefit from fun, themed treats. While some may worry about the "vampire" aspect, these strawberries are usually just playfully decorated fruit. They're typically safe and enjoyable for kids, adding a whimsical touch to your event.
Can You Use Frozen Strawberries Instead of Fresh Ones?
You can use frozen strawberries, but they won't work as well. When thawed, they'll be softer and release more juice, making it harder to decorate. For best results, stick with fresh strawberries. They'll hold their shape better.
How Long Do Vampire Bite Strawberries Stay Fresh?
You'll find they stay fresh for about 1-2 days in the refrigerator. It's best to consume them within 24 hours for optimal taste and appearance. Don't leave them out at room temperature for more than 2 hours.
Are There Any Vegan Alternatives for the Marshmallow Filling?
You've got options for vegan marshmallow fillings! Try whipped coconut cream, aquafaba meringue, or store-bought vegan marshmallow fluff. You can also make your own using agar agar, sugar, and plant-based milk. Get creative and experiment!
Can Vampire Bite Strawberries Be Prepared in Advance?
You can prepare them in advance, but it's best to do so within a few hours of serving. You'll want to keep them refrigerated to maintain freshness. Don't add any toppings until just before serving for the best presentation.