You'll love baking these spooky Wicked Witch Finger Cookies for Halloween! The creepy cookie design was inspired by the iconic Wicked Witch from The Wizard of Oz, symbolizing wickedness with a tasty almond flavor. The simple recipe features butter, sugar, and a touch of almond extract, allowing you to shape the dough into eerie finger shapes and top them with sliced almonds for realistic nails. Bake them to crisp perfection, then decorate however you'd like to truly impress your guests. Enjoy these classic Halloween treats – and read on to discover more details about their history and preparation!
Key Takeaways
- Wicked Witch Finger Cookies are spooky Halloween treats inspired by the iconic Wicked Witch from The Wizard of Oz, symbolizing wickedness.
- The cookies feature an eerie appearance and almond flavor, with key ingredients including flour, butter, sugar, egg, and almond extract.
- The baking process involves shaping the dough into finger-like forms, pressing sliced almonds as nails, and baking until lightly golden.
- Proper cooling and decoration techniques can enhance the cookies' creepy, realistic appearance and add to the overall Halloween theme.
- Wicked Witch Finger Cookies are a versatile and memorable addition to Halloween celebrations, attracting attention with their delicious flavor and spooky aesthetics.

Mighty Gadget Witch Finger Cookie Cutter & Stamp – 4×1.16" "Spooky Fun" for Halloween Baking (Random Color)
- Size: 4×1.16 inches
- Material: Food-safe plastic
- Usage Tip: Use non-raising dough for best results
As an affiliate, we earn on qualifying purchases.
As an affiliate, we earn on qualifying purchases.
History
The origins of the Wicked Witch Finger Cookies trace back to the early 20th century, when bakers sought to capture the eerie atmosphere of Halloween through their culinary creations.
These spooky treats were inspired by the iconic villain from the beloved story of The Wizard of Oz, whose long, bony fingers became an instantly recognizable symbol of her wicked nature.
As the popularity of Halloween grew, these ghoulish cookies became a staple at autumnal celebrations.
Bakers experimented with different shapes, textures, and flavors, always striving to make their version of the Wicked Witch's fingers as unsettling and delightful as possible.
Some opted for a more realistic, gnarled appearance, while others leaned into the cartoonish elements, creating whimsical, brightly colored renditions.
Over the decades, the Wicked Witch Finger Cookies have become a beloved tradition, a way for home bakers to tap into the magic and mystery of the Halloween season.
Their enduring appeal is a testament to the power of nostalgic and imaginative confections.
Recipe
Wicked Witch Finger Cookies are a spooky and delicious treat perfect for Halloween. These ghastly cookies are sure to delight both children and adults with their eerie appearance and tasty almond flavor. When preparing for a festive occasion like Halloween, it's important to also keep an eye on your budget to avoid overspending on treats and decorations, as creating a personal budget can help maintain your financial health.
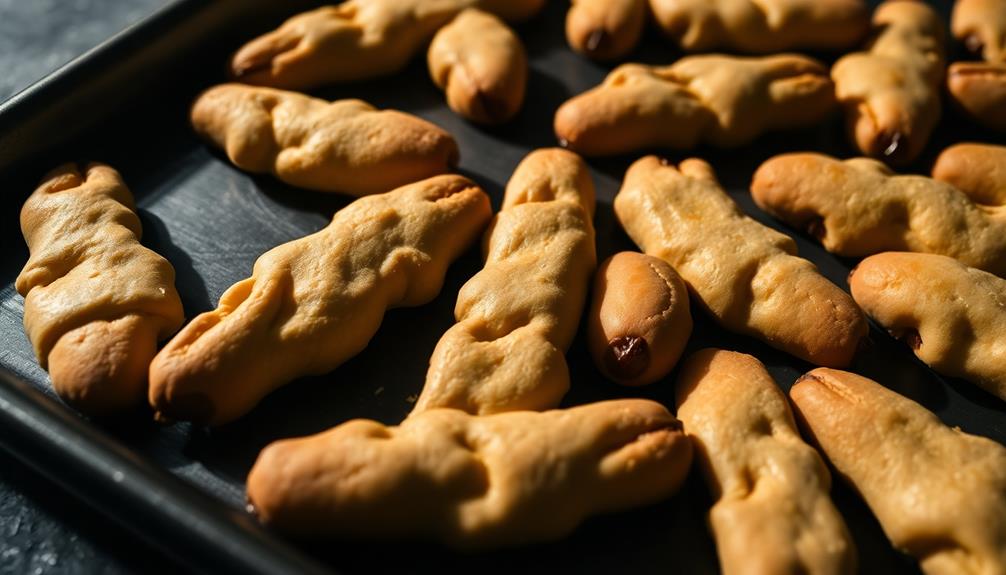
The key to creating these creepy cookies is to focus on the details. From the wrinkled, knobbly "fingers" to the realistic-looking nails, every aspect of these cookies contributes to their Halloween-inspired aesthetic. With a bit of creativity and a steady hand, you can transform simple sugar cookie dough into a tray of twitching, witch-like digits.
Ingredients:
- 2 cups all-purpose flour
- 1/2 teaspoon baking powder
- 1/4 teaspoon salt
- 1 cup unsalted butter, softened
- 3/4 cup granulated sugar
- 1 egg
- 1 teaspoon almond extract
- Red food coloring (optional)
- Sliced almonds for "nails"
Instructions:
Preheat your oven to 375°F (190°C). In a medium bowl, whisk together the flour, baking powder, and salt. In a separate large bowl, cream the butter and sugar until light and fluffy. Beat in the egg and almond extract until well combined. Gradually stir the dry ingredients into the wet ingredients until a dough forms.
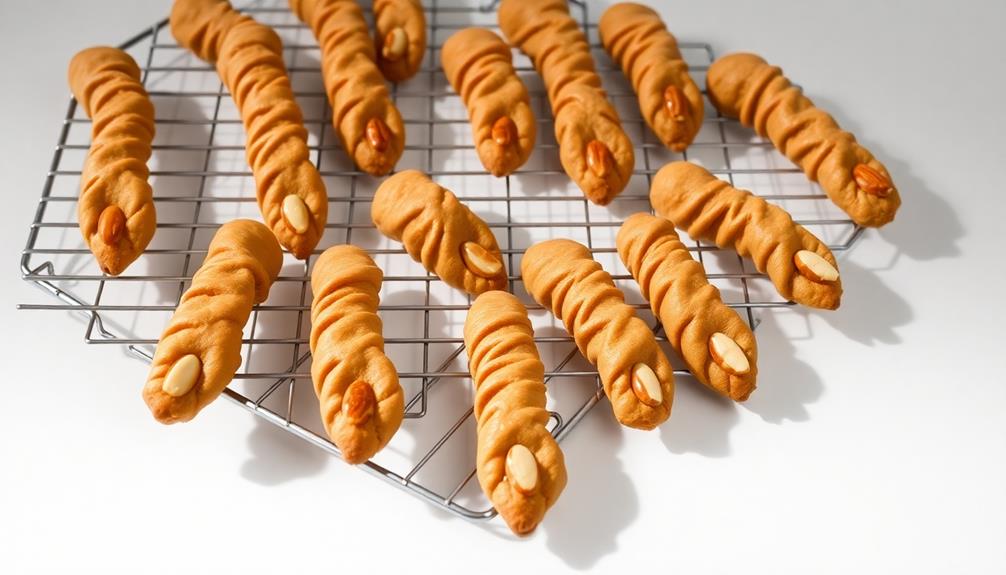
If desired, add a few drops of red food coloring to the dough to create a more "bloody" appearance. Pinch off a small amount of dough and roll it into a finger shape, tapering one end to create the knuckle. Place the dough "fingers" on a parchment-lined baking sheet, spacing them apart. Gently press a sliced almond into the tapered end to create the "nail."
Bake the cookies for 10-12 minutes, or until they're lightly golden. Allow them to cool on the baking sheet for a few minutes before transferring them to a wire rack to cool completely.
These Wicked Witch Finger Cookies are best served on a spooky Halloween platter, alongside other ghoulish treats. The almond flavor pairs perfectly with the crisp, buttery cookie dough, creating a delightful contrast to the unsettling appearance. Enjoy these cookies with a hot cup of apple cider or a glass of milk for a truly hauntingly delicious experience.
Cooking Steps
Start by preheating your oven to 350°F.
Next, mix up the cookie dough according to the recipe.
Then, roll the dough into long, finger-like shapes.
Bake the cookies until they're golden brown, and let them cool before enjoying your wicked witch fingers!
Step 1. Preheat Oven to 350°F
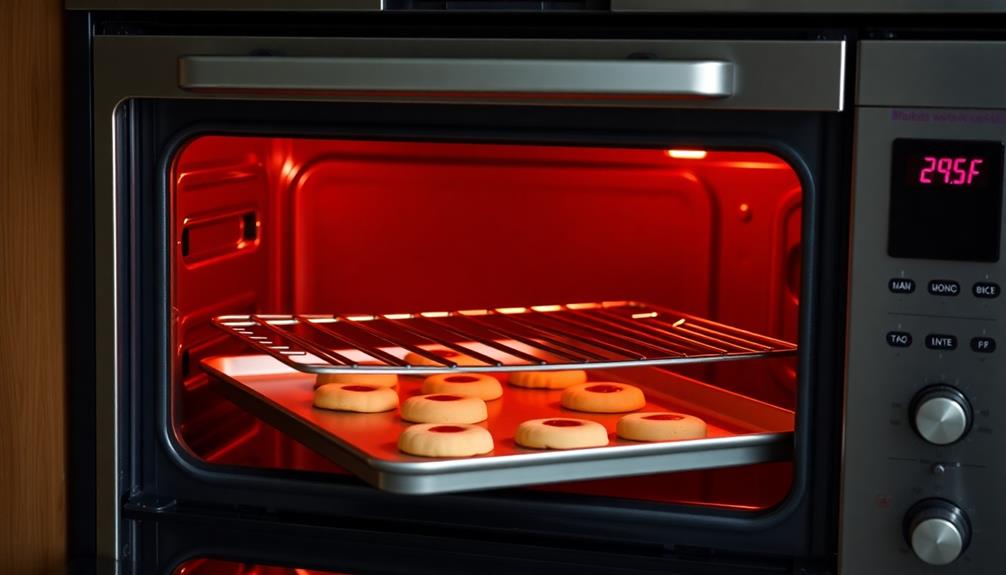
To begin, preheat your oven to a toasty 350°F. This essential first step ensures your oven is properly heated and ready to bake those spooky witch finger cookies to perfection.
Simply adjust your oven rack to the middle position and turn the dial to 350°F. Wait a few minutes until the oven indicator light goes off, signaling it's reached the target temperature.
Now, while the oven preheats, you can gather the rest of your ingredients and supplies. This downtime is a great opportunity to wash your hands and clear your work surface.
Once the oven is ready, you'll be all set to start shaping and baking those creepy, yet delicious, witch fingers. The preheating process only takes about 10-15 minutes, so stay nearby and keep an eye on the temperature.
With the oven preheated, you're one step closer to serving up a batch of ghoulishly good witch finger cookies!
Step 2. Mix Cookie Dough
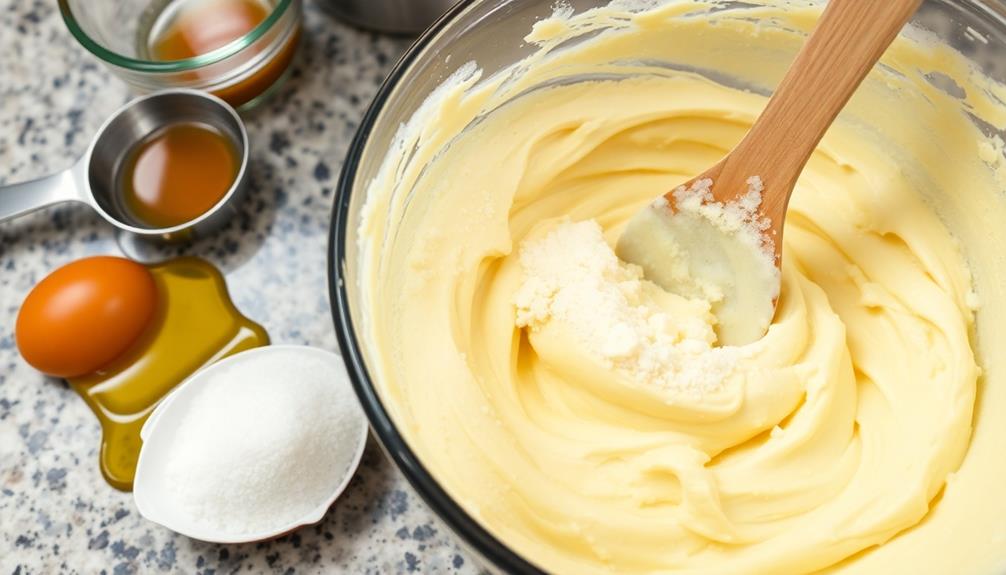
With the oven preheated, you can now focus on mixing the cookie dough. In a large bowl, combine the softened butter, white sugar, and brown sugar. Use a hand mixer or whisk to cream the ingredients together until they're light and fluffy.
Next, crack the eggs into the bowl one at a time, beating well after each addition. Stir in the vanilla extract to enhance the flavor.
In a separate bowl, whisk together the all-purpose flour, baking soda, and salt. Gradually add the dry ingredients to the wet ingredients, mixing until just combined. Be careful not to overmix, as this can result in tough cookies.
Once the dough is ready, use a spoon or cookie scoop to portion it out onto a baking sheet lined with parchment paper. Shape the dough into finger-like shapes to achieve the "wicked witch finger" appearance.
With the dough prepped, you're now ready to bake your creepy crawly cookies.
Step 3. Roll Dough Into Fingers
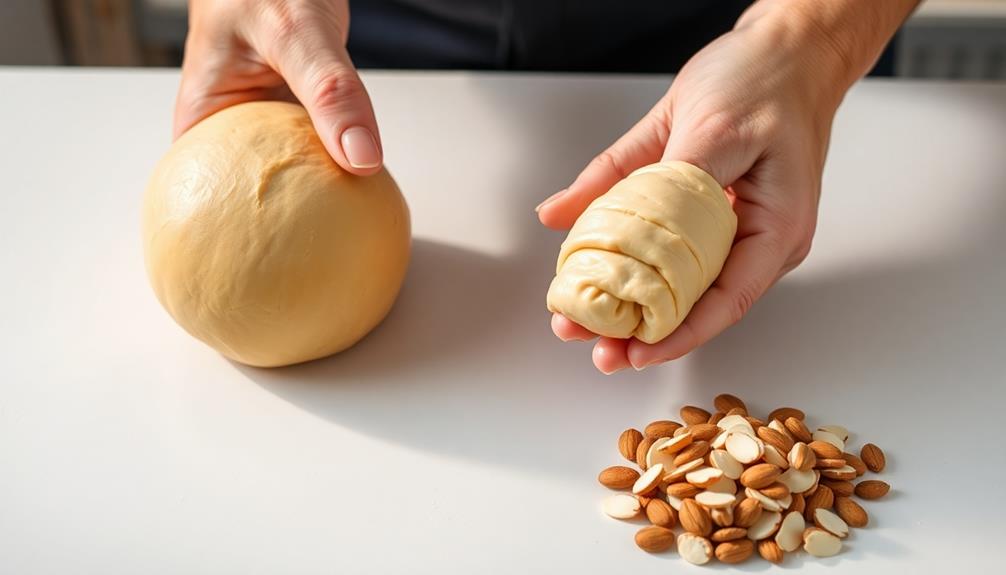
After portioning the dough, it's time to shape the cookies into wicked witch fingers. Take a small chunk of dough and roll it between your palms to form a finger shape. Be sure to taper one end to create the illusion of a crooked, gnarled finger.
Use your fingertips to gently press knuckle indentations along the length of the "finger." Don't worry if they're not perfectly uniform – the more uneven, the more wicked they'll appear!
Once you've shaped the dough, carefully transfer each "finger" to the prepared baking sheet, arranging them with a bit of space between. Use a toothpick or the tip of a knife to add realistic-looking nail details at the tips.
If desired, you can even carve small lines or cracks along the "knuckles" to heighten the eerie effect. Just be gentle to avoid cracking the dough.
Repeat this process until you've used up all the dough, creating a whole tray of spooky witch fingers!
Step 4. Bake Fingers Until Golden Brown

Preheat your oven to 350°F (175°C). Line a baking sheet with parchment paper or a silicone baking mat.
Once the oven is preheated, carefully place the shaped "finger" dough onto the prepared baking sheet, spacing them about 1 inch apart.
Bake the fingers for 12-15 minutes, or until they're golden brown in color. Keep a close eye on them, as ovens can vary, and you don't want the fingers to burn.
The cookies should have a nice, crisp exterior, but still be soft on the inside.
Once baked, remove the tray from the oven and let the fingers cool on the baking sheet for 5 minutes. This will allow them to firm up a bit before transferring them to a wire rack to cool completely.
After the fingers have cooled, you can add any desired spooky decorations, like painted fingernail details, to complete the wicked witch theme.
Enjoy your creepy, yet delicious, Wicked Witch Finger Cookies!
Step 5. Allow Cookies to Cool
Once the Wicked Witch Finger Cookies have finished baking, you'll want to let them cool on the baking sheet for about 5 minutes. This allows the cookies to firm up and prevents them from falling apart when you transfer them to a cooling rack.
During this time, you can admire your handiwork and imagine the delight on your friends' faces when they see these spooky treats.
After the initial 5 minutes, use a spatula to gently transfer the cookies to a wire rack or parchment paper-lined surface. This ensures even cooling and prevents the bottoms from becoming soggy.
Let the cookies cool completely, which should take around 15-20 minutes. Resist the temptation to dig in too soon – patience will be rewarded with perfectly crisp and set cookies.
Once cooled, your Wicked Witch Finger Cookies are ready to be decorated or enjoyed as is. With a little time and care, these eerie delights will be the talk of your Halloween party.
Final Thoughts
These simple yet spooky Wicked Witch Finger Cookies are a delightful addition to any Halloween gathering. With their creepy, realistic appearance and delicious flavor, these cookies are sure to impress your guests and get them into the Halloween spirit.
For a fun twist, consider pairing them with Dirt Cups for an extra spooky dessert spread. While the decorating process may take some time and patience, the end result is well worth the effort.
Feel free to get creative with the cookie shapes and decorations, adapting them to your personal style or the theme of your party. You can even have your guests get involved in the decorating, making it a fun, interactive activity.
Regardless of how you choose to present them, these Wicked Witch Finger Cookies will be a hit at your Halloween celebration. Their unique and eye-catching design, coupled with their delicious taste, will have everyone clamoring for more.
Frequently Asked Questions
Are the Cookies Safe for Children to Eat?
The cookies should be safe for children to eat, as long as they don't contain any ingredients that could be harmful.
It's always a good idea to check the recipe and ensure all the components are suitable for young eaters.
If you have any concerns, you should consult an adult or a trusted source before letting children enjoy the treats.
With a little care and caution, you can ensure everyone can safely indulge in delicious homemade cookies.
How Long Can the Cookies Be Stored?
You can store homemade cookies for up to 5 days at room temperature in an airtight container.
For longer storage, place them in the fridge for up to 2 weeks or the freezer for 2-3 months.
Be sure to let frozen cookies thaw completely before serving.
With proper storage, you can enjoy your tasty treats for quite a while!
Just remember to check for any signs of spoilage before digging in.
Can the Recipe Be Made Vegan or Gluten-Free?
You can absolutely make these cookies vegan or gluten-free!
For a vegan version, swap out the butter for a plant-based alternative like coconut oil or vegan butter.
And to make them gluten-free, use a gluten-free flour blend instead of all-purpose flour.
Just be sure to adjust the baking time as needed, since the dough may behave differently.
With a little tweaking, you can enjoy these cookies even if you have dietary restrictions.
What Is the Origin of the "Wicked Witch Finger" Name?
The "wicked witch finger" name likely stems from the creepy, crooked appearance of these cookie treats. The shape is meant to evoke the gnarled, bony fingers of a classic witch from fairy tales and Halloween folklore.
This spooky visual transforms an ordinary cookie into a fun, festive dessert perfect for embracing your inner witch or wizard. The unsettling yet playful name helps capture the spirit of the season, adding a touch of eerie enchantment to your baking.
Can the Cookies Be Shaped Differently for Different Holidays?
Absolutely! These cookies can be shaped for different holidays with just a few simple tweaks.
For Halloween, craft creepy, crooked "witch fingers."
But come Christmas, you can mold the dough into jolly candy canes or festive trees.
Switching up the shape is an easy way to adapt the recipe for any occasion.
Get creative and have fun shaping the cookies – the possibilities are endless!
Just be sure to adjust baking times as needed for the new shapes.