Witch's Broom Cheese Straws are a spooky twist on classic cheese straws, perfect for your Halloween party. You'll love these savory snacks that blend sharp cheddar, butter, and spices into crispy, broom-shaped treats. They're easy to make: mix ingredients, shape the dough, and bake until golden. You can customize them with different cheeses or seasonings to suit your taste. These cheesy brooms are great as appetizers or fun side dishes that appeal to all ages. Store them in an airtight container for up to three days, but they're best served fresh and warm. Discover how these wickedly delicious snacks can cast a spell on your guests.
Key Takeaways
- Witch's Broom Cheese Straws are Halloween-themed savory snacks made with sharp cheddar cheese and spices.
- The recipe includes shaping dough into broom-like shapes and using pretzel sticks as handles.
- They are easy to prepare, ideal for Halloween parties, and can be made in advance.
- Baking time is 12-15 minutes at 375°F (190°C) until golden brown and crispy.
- These cheese straws can be stored in an airtight container at room temperature for up to 3 days.

WEYDEA Cookie Press Gun Kit 23 in 1 – Stainless Steel Cookie Maker with 13 Discs, 8 Piping Tips & Silicone Baking Mold – Cookie Making Kit for DIY Baking
- Complete Cookie Making Kit: Includes press, discs, tips, and mold
- Durable Stainless Steel Construction: Food-grade, BPA-free, dishwasher safe
- Versatile Cookie Shapes: 13 discs for various designs
As an affiliate, we earn on qualifying purchases.
As an affiliate, we earn on qualifying purchases.
History

The history of Witch's Broom Cheese Straws is shrouded in mystery and folklore. You've probably wondered where these tasty treats got their spooky name. Legend has it that they were first created by a clever witch who wanted to disguise her magic wand as a harmless snack. She coated her broomstick bristles with cheese and baked them until crispy, creating the first cheese straws.
While that's just a fun story, the real origin of cheese straws dates back to the 19th century in England. They became popular as a savory snack to accompany afternoon tea. The "Witch's Broom" variation likely emerged later as a Halloween-themed twist on the classic recipe.
You'll find that cheese straws have been a staple at social gatherings for generations. They're often served at parties, holiday events, and even weddings.
The witch's broom version adds a whimsical touch to Halloween celebrations, delighting both kids and adults. Today, you can find many recipes and variations of these cheesy, crispy treats, each with its own unique flavor and twist.
Recipe

Witch's Broom Cheese Straws are a delightful and spooky treat perfect for Halloween parties or autumn gatherings. These crispy, cheesy snacks are shaped to resemble witch's brooms, adding a touch of whimsy to your festive spread. The combination of sharp cheddar cheese and savory spices creates a mouthwatering flavor that will have your guests reaching for more.
This recipe is simple to make and can be prepared in advance, making it ideal for busy hosts. The cheese straws can be customized with different types of cheese or additional seasonings to suit your taste preferences. Whether served as an appetizer or a fun side dish, these Witch's Broom Cheese Straws are sure to cast a spell on your taste buds.
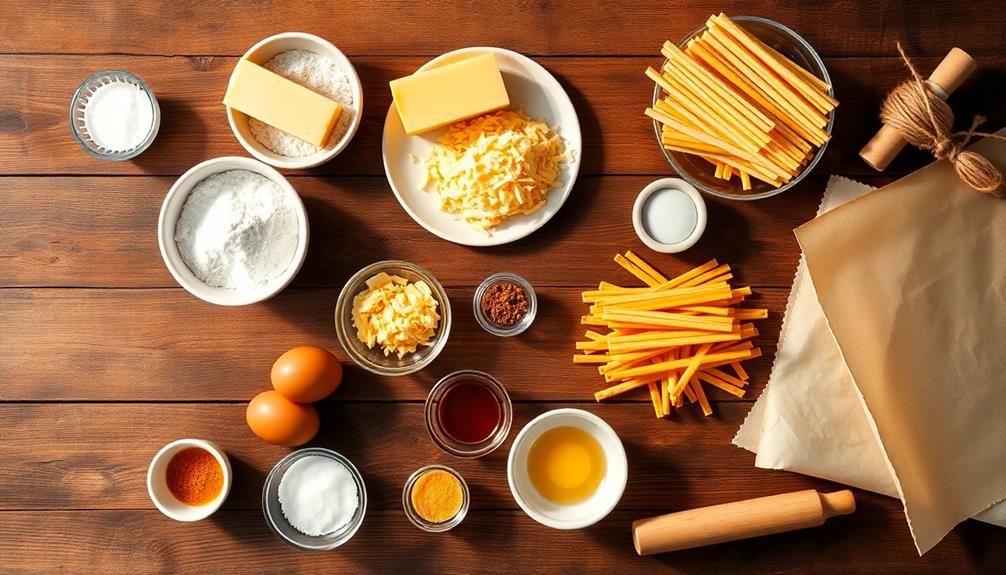
- 1 cup all-purpose flour
- 1/2 cup unsalted butter, softened
- 2 cups sharp cheddar cheese, grated
- 1/4 teaspoon salt
- 1/4 teaspoon paprika
- 1/8 teaspoon cayenne pepper
- 1 large egg, beaten
- Pretzel sticks
Preheat the oven to 375°F (190°C). In a large bowl, mix flour, softened butter, grated cheese, salt, paprika, and cayenne pepper until well combined. Roll the dough into small balls and shape them into broom-like shapes on a parchment-lined baking sheet.
Brush each cheese straw with beaten egg and gently press a pretzel stick into one end to create the broom handle. Bake for 12-15 minutes or until golden brown. Allow to cool completely before serving.
For best results, make sure your butter is at room temperature before mixing. If the dough becomes too soft while shaping, refrigerate it for 10-15 minutes to firm it up. To achieve a more pronounced broom shape, use a fork to create bristle-like marks on the cheese portion before baking.
These cheese straws can be stored in an airtight container at room temperature for up to 3 days, making them a great make-ahead option for your Halloween festivities.
Cooking Steps

To make these whimsical cheese straws, you'll start by preheating your oven to 375°F.
Next, you'll mix the cheese and flour, then add butter to create a dough that you'll roll into straw shapes.
Step 1. Preheat Oven to 375°F

Preheating your oven is the crucial first step in creating perfect Witch's Broom Cheese Straws. Set your oven to 375°F (190°C) and let it warm up while you prepare the other ingredients. This temperature is ideal for baking cheese straws, ensuring they'll turn golden brown and crispy without burning.
As you wait for the oven to heat, gather your baking sheets and line them with parchment paper. This will prevent sticking and make cleanup easier. Don't rush this step; a properly preheated oven is key to even baking. If your oven has a built-in thermometer, check it to make sure it's accurate. Some ovens can be off by a few degrees, which can affect your baking results.
While the oven heats, you can start mixing your ingredients. The warmth from the preheating oven will create a cozy kitchen atmosphere, perfect for baking these spooky treats.
Step 2. Mix Cheese and Flour

With your oven warming up nicely, it's time to focus on the heart of your Witch's Broom Cheese Straws: the dough. You'll need a large mixing bowl to combine your ingredients.
Start by measuring out 2 cups of all-purpose flour and 2 cups of finely shredded sharp cheddar cheese. Make sure your cheese is at room temperature for easier mixing.
Add the flour and cheese to your bowl, then sprinkle in 1/2 teaspoon of salt and 1/4 teaspoon of cayenne pepper for a little kick. If you're not a fan of spice, you can omit the cayenne.
Now, use your hands or a wooden spoon to mix everything together. You're aiming for an even distribution of cheese throughout the flour.
As you mix, you'll notice the cheese starting to coat the flour particles. This is exactly what you want! Keep mixing until you can't see any large clumps of cheese or patches of plain flour.
The mixture should look somewhat like coarse sand. Don't worry if it seems a bit dry at this stage – we'll be adding wet ingredients next to bring it all together.
Step 3. Add Butter to Mixture

Cold butter is the secret to achieving the perfect texture for your Witch's Broom Cheese Straws. You'll want to use unsalted butter that's been chilled in the refrigerator. Cut it into small cubes, about 1/4 inch in size, to make it easier to incorporate into the mixture.
Now, add the cold butter cubes to your cheese and flour mixture. Using your fingertips, gently work the butter into the dry ingredients. You're aiming for a crumbly texture that resembles coarse breadcrumbs.
Don't overwork the dough, as this can make your cheese straws tough. If you find the butter starting to melt from the warmth of your hands, pop the bowl in the fridge for a few minutes to chill it.
As you mix, you'll notice the dough beginning to come together. It'll still be somewhat crumbly, but that's okay! This texture will help create those deliciously flaky cheese straws.
Step 4. Roll Dough Into Straws

Now that your dough has reached the perfect crumbly consistency, it's time to shape it into those iconic witch's broom straws. Sprinkle a bit of flour on your work surface to prevent sticking, and turn out the dough. Using your hands, gently knead the dough a few times to bring it together.
Next, divide the dough into smaller portions. Roll each portion into a long, thin rope about 1/4 inch in diameter. Don't worry if they're not perfectly uniform; that'll add to the rustic charm of your witch's brooms. Cut these ropes into 6-inch lengths, or adjust based on your preference.
For the bristles, use a sharp knife to make small cuts along one end of each straw. These cuts should be about 1 inch long and spaced closely together. As you work, place the finished straws on a lined baking sheet, leaving a little space between each one.
If the dough starts to warm up and become too soft, pop it in the fridge for a few minutes. This'll make it easier to work with and help maintain those crisp edges you're aiming for.
Step 5. Bake Until Golden Brown

Ready to transform your witch's broom cheese straws from doughy to delectable? It's time to bake these savory treats to crispy perfection!
Preheat your oven to 375°F (190°C). While it's heating up, line two baking sheets with parchment paper. This will prevent your cheese straws from sticking and make cleanup a breeze.
Carefully transfer your rolled cheese straws onto the prepared sheets, leaving about an inch of space between each one. They'll spread a bit as they bake, so don't overcrowd them.
Slide the baking sheets into the preheated oven and set your timer for 12 minutes. Keep an eye on them, though! You're looking for a golden-brown color and a crispy texture.
Depending on your oven, they might need an extra minute or two. When they're done, you'll notice the edges turning a slightly darker shade of gold. That's your cue to take them out.
Let the cheese straws cool on the baking sheets for about 5 minutes before transferring them to a wire rack. They'll continue to crisp up as they cool down.
Final Thoughts
These Witch's Broom Cheese Straws are a delightful addition to any Halloween party or autumn gathering. You'll love how easy they're to make and how they instantly add a spooky touch to your table.
Remember, the key to perfect cheese straws is using high-quality cheese and getting that golden-brown color just right.
Don't be afraid to experiment with different cheese combinations or add some herbs for extra flavor. You can make these ahead of time and store them in an airtight container, but they're best served fresh and warm.
If you have leftovers, they'll keep for a few days, though they might lose some of their crispness.
Kids and adults alike will enjoy these tasty treats, and they're sure to be a hit at your next Halloween bash. You might even want to make a double batch, as they tend to disappear quickly!
With their crispy texture and cheesy flavor, these Witch's Broom Cheese Straws are sure to become a Halloween tradition in your home.
Frequently Asked Questions
Can Witch's Broom Cheese Straws Be Made Gluten-Free?
Yes, you can make gluten-free cheese straws. You'll need to substitute regular flour with a gluten-free alternative like almond or rice flour. Be sure to adjust the recipe accordingly, as gluten-free flours may affect texture and binding.
How Long Do Witch's Broom Cheese Straws Stay Fresh?
You'll find they stay fresh for about 3-5 days when stored in an airtight container at room temperature. If you want them to last longer, you can freeze them for up to 3 months. They're best enjoyed fresh, though!
Are There Vegetarian or Vegan Alternatives for Witch's Broom Cheese Straws?
You'll find vegetarian options easily by using non-animal rennet cheese. For vegan alternatives, try substituting the cheese with nutritional yeast or vegan cheese. You can also experiment with nut-based "cheeses" to create similar savory, crispy snacks.
Can Different Types of Cheese Be Used in the Recipe?
Absolutely! You can experiment with various cheeses in your recipe. Try sharp cheddar, Gruyère, Parmesan, or even blue cheese for unique flavors. Don't be afraid to mix cheeses or add herbs for extra zest.
Are Witch's Broom Cheese Straws Suitable for Freezing and Reheating?
You can freeze and reheat cheese straws easily. They'll keep for up to 3 months in the freezer. When you're ready to enjoy them, just pop them in a preheated oven for a few minutes until they're crisp again.